Your Guide to SSL Configuration in Apache Web Server
A solid SSL configuration in your Apache web server is the bedrock of modern web security. It’s what encrypts the data flowing between your server and your users, building the trust that’s essential for any online presence. The whole process boils down to enabling Apache’s SSL module, getting a certificate from a trusted authority like Let’s Encrypt, and then telling a Virtual Host how to handle all that secure traffic over port 443.
This isn’t just a “nice-to-have” anymore. It’s a non-negotiable step for protecting sensitive information and, frankly, for even showing up in search engine results.
Why a Modern Apache SSL Configuration is So Critical
Locking down your web traffic has moved from an optional upgrade to a baseline requirement for any site that wants to be taken seriously. A properly set up SSL/TLS configuration does a lot more than just put a padlock icon in the browser’s address bar. It’s a critical defensive layer that protects user data, stops eavesdroppers cold, and proves your server is who it says it is.
Without that encryption, every piece of data—from login credentials to personal details—is sent in plain text. It’s practically an open invitation for interception. This doesn’t just put your users at risk; it shreds your site’s credibility. On top of that, search engines like Google actively downrank sites that don’t use HTTPS, which means less visibility and less traffic. A robust SSL configuration in Apache tackles all these problems head-on.
The Core Components of a Secure Setup
To get this right, you first need to know the key players involved. Each part has a specific job in creating that trusted, encrypted connection:
mod_sslModule: Think of this as the cryptographic engine for Apache. It’s the module that provides all the TLS encryption capabilities. You have to enable it before you can do anything else.- Certificate Authority (CA): This is a trusted third party, like Let’s Encrypt or DigiCert, that verifies you own your domain and then issues you a digital SSL certificate.
- SSL Certificate: A digital file that contains your public key and domain information. It’s what proves your identity to browsers.
- Private Key: The secret counterpart to your public certificate, living securely on your server. This key is used to decrypt the information sent by your users’ browsers.
It’s About More Than Just the Padlock
Flipping the switch on SSL is a great first step, but modern security is a much deeper game. Simple mistakes in your configuration can leave your server wide open. For example, path traversal vulnerabilities like CVE-2021-41773 showed how a poorly configured Apache setup could lead to remote code execution—even on a server with SSL enabled. It’s a stark reminder that just having SSL isn’t enough; you have to harden the entire configuration.
The real goal isn’t just to encrypt traffic, but to build a resilient security posture. That means choosing strong ciphers, killing off outdated protocols, and putting security headers in place to fend off more advanced threats.
This guide is designed to give you the practical knowledge to go far beyond a basic setup. For those looking to go even deeper, it’s worth understanding the broader security landscape. Learning about comprehensive web application security testing is a perfect next step to complement your new and improved SSL implementation. The sections that follow will walk you through the actionable steps for every stage of this process.
Acquiring Your SSL Certificate
Before your Apache server can handle HTTPS traffic, it needs an identity—the SSL certificate. Think of it as a digital passport, issued by a trusted Certificate Authority (CA), that verifies your domain’s ownership and allows encrypted connections.
You have two main paths to get one. There’s the traditional, manual route using a Certificate Signing Request (CSR), and the modern, automated approach with tools like Certbot for Let’s Encrypt.
This flowchart gives you a high-level look at the entire process, from enabling the right modules to getting the server configured.
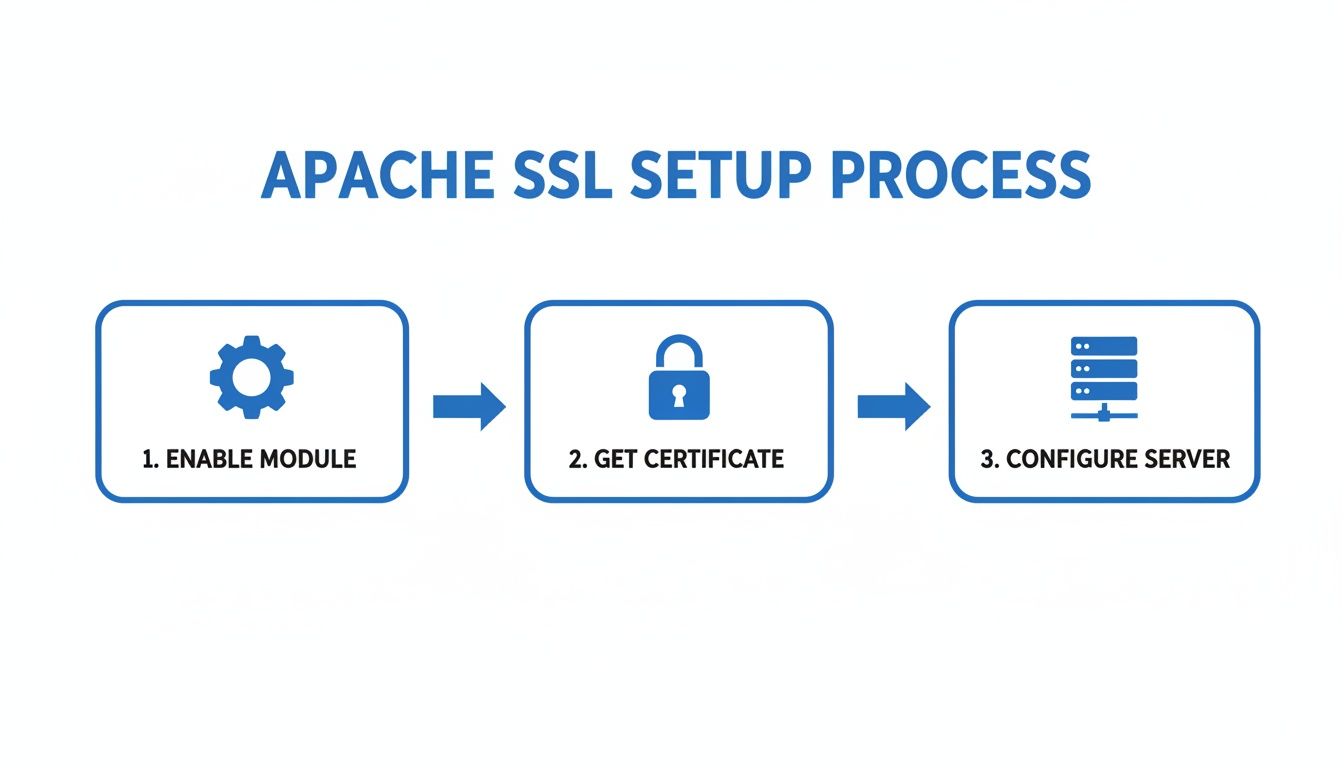
It boils down to three core stages: activating the necessary modules, obtaining your certificate, and finally, telling Apache how to use it.
The Traditional Path with OpenSSL and a CSR
For years, the go-to method was generating a private key and a CSR right on your server. The CSR packages your public key and identifying info, which you then send to a commercial CA to buy a certificate.
This method is still essential for certain certificate types, like Extended Validation (EV) certs that require deeper business vetting. You can knock out both the key and CSR with a single OpenSSL command.
openssl req -new -newkey rsa:2048 -nodes -keyout yourdomain.key -out yourdomain.csr
Let’s quickly break down what’s happening here:
req -new -newkey rsa:2048: This tells OpenSSL to create a new CSR along with a fresh 2048-bit RSA private key.-nodes: Short for “no DES,” this flag stops OpenSSL from encrypting your private key with a passphrase. It might seem less secure, but it’s crucial for Apache to restart automatically without a human needing to type a password.-keyout yourdomain.key: This is just the filename for your new private key.-out yourdomain.csr: And this is the filename for your new CSR file.
Once you run this, you’ll be prompted for details like your country, organization, and—most importantly—the Common Name. This has to be the exact domain you’re securing. From there, you copy the contents of yourdomain.csr and give it to your CA. They’ll do their verification and send the signed certificate files back to you.
The Automated Route with Let’s Encrypt and Certbot
The game completely changed with Let’s Encrypt, a free and automated CA. The best way to use it is with the Certbot client, which handles the entire process of getting and installing a certificate.
For over 95% of websites, this is the way to go. It’s simple, fast, and free.
Certbot is a lifesaver. It doesn’t just grab the certificate; it can also rewrite your Apache configuration to install it and even set up redirects from HTTP to HTTPS. This makes securing a website ridiculously easy.
First, you’ve got to install the Certbot client. The command changes depending on your OS, but for a Debian-based system like Ubuntu, it’s pretty straightforward.
sudo apt-get update
sudo apt-get install certbot python3-certbot-apache
With Certbot installed, getting and installing a certificate is just a single command. The Apache plugin is smart enough to find the domains in your Virtual Hosts and walk you through the setup.
sudo certbot --apache
Certbot will ask which domains you want to enable HTTPS for and if you want to redirect all HTTP traffic to HTTPS (you should). Behind the scenes, it completes the domain validation challenge, fetches the certs from Let’s Encrypt, and neatly tucks them away in /etc/letsencrypt/live/yourdomain/.
It then updates your Apache config to point to the new files, turning the entire ssl configuration in the apache web server into a hands-off task. This isn’t just about convenience; it’s a huge step forward for making web security accessible to everyone.
Configuring Your Apache Virtual Host for SSL
Alright, you’ve got your SSL certificate files. Now it’s time to put them to work by telling Apache how to actually use them. This is where we’ll dive into your site’s configuration and set up a secure VirtualHost that listens on port 443, the universal standard for HTTPS traffic.
This configuration block is the real heart of your SSL setup. It’s what tells Apache to fire up its encryption engine for your domain and points it to the exact certificate and private key it needs to build that secure connection with your visitors.
Building the Secure VirtualHost Block
Your new secure VirtualHost will live inside a configuration file, which on Debian-based systems like Ubuntu, you’ll typically find in /etc/apache2/sites-available/. A solid best practice is to copy your existing HTTP config (something like yourdomain.conf) to a new file, maybe yourdomain-ssl.conf, and then modify it for SSL.
This new configuration needs to be wrapped in <VirtualHost *:443> tags. That tells Apache to listen for secure connections on that port. Inside this block, a few key directives are non-negotiable.
SSLEngine on: This is the master switch. It tells Apache to enable the SSL/TLS protocol engine for this virtual host.SSLCertificateFile: This directive points to your public certificate file. If you’re using Certbot, it’s usually/etc/letsencrypt/live/yourdomain/fullchain.pem.SSLCertificateKeyFile: This points to your private key, like/etc/letsencrypt/live/yourdomain/privkey.pem. This file is your crown jewel—keep it protected and unreadable by anyone else.
Here’s a practical, minimal example you can adapt. I’m assuming you’ve already defined ServerName and DocumentRoot in your original configuration.
<VirtualHost *:443> ServerAdmin [email protected] ServerName yourdomain.com ServerAlias www.yourdomain.com DocumentRoot /var/www/yourdomain
SSLEngine on
SSLCertificateFile /path/to/your_domain_name.crt
SSLCertificateKeyFile /path/to/your_private.key
SSLCertificateChainFile /path/to/your_chain.pem

# Other configurations like logging can go here
ErrorLog ${APACHE_LOG_DIR}/error.log
CustomLog ${APACHE_LOG_DIR}/access.log combined
You might see the SSLCertificateChainFile directive around, which was for older Apache versions. Nowadays, especially with tools like Certbot, the fullchain.pem file you use for SSLCertificateFile already includes the necessary intermediate certificates, so you often don’t need it.
Forcing All Traffic to HTTPS
Just setting up a secure site isn’t the whole story. You have to make sure everyone actually uses it. If your site works over both HTTP and HTTPS, you’ll run into duplicate content issues with search engines and, more importantly, leave visitors unprotected if they happen to land on the old, unencrypted version.
The fix is a permanent, server-side 301 redirect. It automatically and seamlessly forwards any request for http://yourdomain.com straight to the secure https://yourdomain.com version.
A 301 redirect is the gold standard for migrating to HTTPS. It tells search engines that the HTTPS version is the one true source, transferring all your hard-earned SEO value and locking in a secure connection for every user.
You can set this up by modifying your original port 80 VirtualHost block. A few lines using Apache’s powerful mod_rewrite module will do the trick.
Here’s what your port 80 VirtualHost should end up looking like:
<VirtualHost *:80> ServerName yourdomain.com ServerAlias www.yourdomain.com
RewriteEngine On
RewriteCond %{HTTPS} off
RewriteRule ^(.*)$ https://%{HTTP_HOST}%{REQUEST_URI} [L,R=301]
Let’s quickly break that down:
RewriteEngine On: This just turns on the rewriting engine.RewriteCond %{HTTPS} off: This sets a condition: “only proceed if the connection is not already secure.”RewriteRule ... [L,R=301]: If that condition is met, this rule redirects the user to the exact same URL, but withhttps://. The[L,R=301]flags tell Apache it’s a permanent redirect (301) and to stop processing any more rules (L).
The Importance of Correct Configuration
A tiny typo in these config files can have massive security implications. From my experience, misconfigurations cause far more vulnerabilities than actual bugs in the Apache software itself.
For example, the Apache HTTP Server’s 2.4.64 release patched a flaw, CVE-2025-23048, related to how mod_ssl handled TLS 1.3 session resumption. This could allow an attacker to bypass access controls in certain setups, showing how these complex interactions can create unexpected security gaps. It’s critical to avoid these pitfalls, especially since Apache still powers somewhere between 15-26% of global websites. You can read the full security advisory about recent Apache HTTP Server patches to stay on top of emerging threats.
Once you save your new configuration, you have to enable the new site and the SSL module itself, then reload Apache. On Debian/Ubuntu systems, the commands look like this:
sudo a2enmod ssl
sudo a2ensite yourdomain-ssl.conf
sudo systemctl restart apache2
And one final pro tip: always run apachectl configtest before you restart. It’s a lifesaver that will catch syntax errors before they have a chance to take your entire server offline.
Hardening Your TLS Security Settings
Just flipping the switch on SSL isn’t enough. A default Apache configuration is merely a starting point. To build a truly secure server, you need to actively harden your Transport Layer Security (TLS) settings. This means getting your hands dirty with the configuration files to disable outdated protocols, hand-pick strong encryption ciphers, and implement modern security headers.

These are the changes that separate an adequate setup from a rock-solid one, protecting you from common exploits and helping you earn that coveted A+ on security scans.
Eliminating Obsolete Protocols
First things first: you have to explicitly forbid weak and compromised protocols. Anything like SSLv3 or the early versions of TLS (1.0 and 1.1) are packed with known vulnerabilities and have no place on a modern server. The SSLProtocol directive is your tool for the job.
By specifying only modern, secure protocols, you shut the door on downgrade attacks, where a malicious actor could trick a browser and your server into communicating over an older, breakable protocol.
Drop this line into your ssl.conf or right inside your SSL VirtualHost block. It tells Apache to support all protocols except the ones we want to banish.
SSLProtocol all -SSLv3 -TLSv1 -TLSv1.1
This simple line effectively makes TLS 1.2 and TLS 1.3 your minimum standard.
Selecting a Strong Cipher Suite
Next up is defining the cryptographic algorithms—the ciphers—your server will agree to use. A weak cipher suite can completely undermine the security of even the newest TLS protocol. The goal here is to prioritize ciphers that provide Perfect Forward Secrecy (PFS).
PFS is a clever feature that ensures if your server’s private key is ever stolen, an attacker can’t use it to go back and decrypt previously recorded traffic. It works by generating a unique session key for every single connection.
The
SSLCipherSuitedirective is arguably the most critical part of a hardened SSL configuration. It dictates the strength and order of encryption algorithms your server will negotiate with clients. Getting this right is non-negotiable for modern security.
A strong, modern cipher suite favors algorithms like AES-GCM and ChaCha20-Poly1305, using Elliptic Curve Diffie-Hellman (ECDHE) for the key exchange. This one from Mozilla is a fantastic starting point that balances top-tier security with broad client compatibility:
SSLCipherSuite ECDHE-ECDSA-AES128-GCM-SHA256:ECDHE-RSA-AES128-GCM-SHA256:ECDHE-ECDSA-AES256-GCM-SHA384:ECDHE-RSA-AES256-GCM-SHA384:ECDHE-ECDSA-CHACHA20-POLY1305:ECDHE-RSA-CHACHA20-POLY1305:DHE-RSA-AES128-GCM-SHA256:DHE-RSA-AES256-GCM-SHA384
While you’re at it, tell Apache to enforce its own preferred cipher order, not the client’s.
SSLHonorCipherOrder on
This stops a client from trying to negotiate a weaker cipher than what your server prefers. It’s a simple directive with a big impact.
To give you a clearer picture, here’s a breakdown of the key directives and why they matter.
TLS Protocol and Cipher Suite Recommendations
This table summarizes the essential Apache directives for locking down your server’s encryption settings.
| Directive | Recommended Value | Purpose |
|---|---|---|
SSLProtocol | all -SSLv3 -TLSv1 -TLSv1.1 | Disables old, vulnerable protocols, enforcing TLS 1.2 or TLS 1.3. |
SSLCipherSuite | See Mozilla’s Modern recommendation above | Specifies a strong list of ciphers with Perfect Forward Secrecy. |
SSLHonorCipherOrder | on | Forces clients to use the server’s preferred, more secure cipher. |
Getting these settings right is the foundation of a hardened TLS configuration.
Deploying Advanced Security Headers
With your protocols and ciphers locked down, the final piece of the puzzle is deploying HTTP security headers. These are instructions your server sends to browsers, telling them how to behave when connecting to your site.
- HTTP Strict Transport Security (HSTS): This is non-negotiable. HSTS is a header that tells browsers to only ever talk to your server over HTTPS. It effectively kills man-in-the-middle attacks that try to downgrade a connection back to unencrypted HTTP.
- OCSP Stapling: This is more of a performance boost. It lets your server cache the certificate revocation status (the OCSP response) from the Certificate Authority. This saves the user’s browser from having to make a separate, slow query to check if your certificate is still valid.
To get these running, add the following lines inside your SSL VirtualHost configuration:
HSTS (max-age is 1 year)
Header always set Strict-Transport-Security “max-age=31536000; includeSubDomains”
OCSP Stapling
SSLUseStapling on SSLStaplingCache “shmcb:logs/stapling-cache(150000)”
By 2025, running an Apache server without HTTPS will be completely unacceptable. With Apache powering 26.2% of the web server market, getting security right is a huge responsibility. Yet, an estimated 30% of servers have SSL misconfigurations. Enforcing TLS 1.3 requires at least Apache 2.4.43 and OpenSSL 1.1.1, but only 62% of Apache sites are currently enforcing it, leaving a wide-open door for attackers. For more context, you can explore how to secure an Apache server on Windows in 2025.
These hardening steps transform a basic SSL configuration in an Apache web server into a robust defense against modern threats.
Verifying and Automating Your SSL Setup
Getting SSL configured is a huge step, but don’t pop the champagne just yet. The real win comes from knowing your setup is flawless and will stay that way without you having to constantly babysit it. A truly professional SSL configuration in an Apache web server is one that’s been verified, hardened, and automated for the long haul.
The very first thing you should do after any change is a simple syntax check. It’s a lifesaver. Before you even think about restarting Apache, run this command:
apachectl configtest
If you get back “Syntax OK,” you’re golden. If not, it’ll tell you exactly which file and line number is causing the trouble. This little check can save you from the gut-wrenching feeling of a server that refuses to start.
Diving Deeper with Command-Line Tools
With your syntax confirmed, it’s time to check the TLS handshake itself. The openssl command is perfect for this—it connects to your server just like a browser and spits out a wealth of information about the certificate and connection.
openssl s_client -connect yourdomain.com:443
This output lets you see the full certificate chain, the TLS version that was negotiated, and the exact cipher suite being used. It’s the fastest way to confirm that all the security hardening you just did is actually working, all without leaving your terminal.
Achieving the A+ Grade with Online Scanners
For the definitive report card on your SSL/TLS setup, you can’t beat a good online scanner. The gold standard here is the SSL Server Test from Qualys SSL Labs. Just plug in your domain, and it runs a massive battery of tests, checking everything from protocol support to known vulnerabilities.
The goal is an ‘A+’ rating. The report gives you a detailed breakdown of its findings and points out any weaknesses. If you’ve properly disabled old protocols, set up a strong cipher suite, and enabled HSTS, you should be well on your way to earning top marks.
The Critical Role of Automated Renewals
One of the most common—and completely avoidable—reasons for website downtime is an expired SSL certificate. Relying on your calendar to manually renew certificates is a recipe for disaster. This is where Certbot’s automation really shines.
When you install a certificate with Certbot, it doesn’t just drop the files on your server; it also sets up a cron job or systemd timer to handle renewals. This process runs in the background, checks if your certificates are getting close to their expiration date, and renews them for you. No manual intervention needed.
Automation isn’t a luxury; it’s a necessity for robust security. Forgetting to renew a certificate can instantly erode user trust and take your site offline. Certbot’s “set it and forget it” renewal process is one of its most powerful features.
You can even do a “dry run” to make sure the automated renewal process is configured correctly without touching your live certificates.
sudo certbot renew --dry-run
This simulates the entire renewal process and will flag any issues that could prevent a successful renewal down the road.
Validating Performance with Traffic Replay
For development and QA teams, it’s crucial to verify that a new SSL configuration doesn’t create performance bottlenecks, especially for high-traffic applications. This is where a tool like GoReplay becomes invaluable. It lets you capture live production traffic and replay it against a staging environment.
This approach ensures your new, hardened SSL setup can handle a real-world load. Proper TLS configuration is also vital for the integrity of this testing. Vulnerabilities like CVE-2025-49812, which exposed TLS upgrade flaws in mod_ssl, show how misconfigurations can lead to session hijacking. With over 141 CVEs logged for Apache 2.4.x versions, your test environment’s SSL setup must mirror production to catch these issues before they hit users. You can find more details in this latest Apache vulnerability analysis.
By replaying traffic, you can validate TLS resilience and performance under realistic conditions. To get started with this technique, check out our guide on how to capture network traffic for effective testing. It’s the best way to bridge the gap between development and production, giving you real confidence in your deployment.
Gotchas and Common Questions with Apache SSL
When you’re staring at a screen full of SSL directives, it’s easy to get turned around. Setting up a solid SSL configuration in an Apache web server almost always surfaces a few classic problems, especially when you’re juggling multiple domains or trying to figure out why a restart failed. Let’s walk through some of the most common snags I’ve seen and get you back on track.
These are the kinds of issues that can trip up anyone, but the fix is usually simple once you know where to look.
How Do I Use One SSL Certificate for Multiple Subdomains?
It’s a classic scenario: you need to secure not just yourdomain.com, but also blog.yourdomain.com and api.yourdomain.com. Managing a separate certificate for each is a recipe for headaches and human error. The smart move here is to use either a Multi-Domain (SAN) certificate or a Wildcard certificate.
- Multi-Domain (SAN) Certificate: This lets you list several specific hostnames on a single certificate. It’s perfect when you have a predictable, finite set of subdomains to lock down.
- Wildcard Certificate: This one covers all subdomains at a single level, like
*.yourdomain.com. This is your best bet for dynamic setups where you might spin up new subdomains on the fly.
If you’re using Let’s Encrypt and Certbot, getting a SAN certificate is dead simple. Just stack up the -d flags in your command, one for each domain.
certbot --apache -d yourdomain.com -d www.yourdomain.com -d blog.yourdomain.com
Certbot handles the rest, fetching a single certificate valid for all those domains. From there, you just point each subdomain’s VirtualHost block to the same certificate files. Easy.
What’s the Difference Between the Main Certificate Directives?
As you dig into your VirtualHost config, you’ll hit a trio of SSLCertificate directives that look awfully similar. Getting their roles straight is non-negotiable for a working setup.
Here’s how I think about it: Imagine a lock, a key, and a certificate of authenticity. The
SSLCertificateFileis the public lock you show everyone. TheSSLCertificateKeyFileis the secret key that opens it. And theSSLCertificateChainFileproves the lock manufacturer is legit.
Let’s break them down:
SSLCertificateFile: This points to your server’s public certificate (the.crtfile). This is the part you share with the world.SSLCertificateKeyFile: This points to your private key (the.keyfile). This is the crown jewels—keep it secret, keep it safe. If this file gets compromised, your entire SSL setup is toast.SSLCertificateChainFile: This directive points to the intermediate certificates from your Certificate Authority (CA). They form a “chain of trust” connecting your server’s certificate back to a root CA that browsers already trust. Modern tools like Certbot often bundle this into afullchain.pemfile, which you can use for theSSLCertificateFiledirective to keep things tidy.
How Do I Troubleshoot Apache Failing to Start After Enabling SSL?
We’ve all been there. You tweak your SSL config, confidently run systemctl restart apache2, and… crickets. The server just won’t start. The absolute first thing to do is check your syntax.
apachectl configtest
This command is your best friend. It parses your config files and will almost always tell you exactly which line is causing the trouble. If the syntax checks out, the culprit is usually one of these usual suspects:
- Bad File Paths: A simple typo in your
SSLCertificateFileorSSLCertificateKeyFilepath is a surprisingly common mistake. Double-check them. - File Permissions: The Apache user (usually
www-data) needs read access to the certificate and, most importantly, the private key file. - Port Conflicts: Make sure nothing else is hogging port 443.
- Missing Module: Did you remember to enable
mod_ssl? A quicka2enmod sslwill fix that.
When in doubt, check your Apache error log. It’s typically found at /var/log/apache2/error.log and will give you the gory details of why the server failed to start.
At GoReplay, we know that building resilient systems means testing with real data. By capturing and replaying your actual production traffic, you can validate your application’s performance and security under the chaos of real-world conditions. Find out how you can ship code with confidence.