A Practical Guide to Rest Assured API Testing

When you’re working in the Java ecosystem, testing APIs can feel clunky. You often end up writing a ton of boilerplate code just to make a simple HTTP request and check the response. That’s precisely the problem Rest Assured was built to solve. It’s a powerful Java library designed from the ground up to make validating REST services straightforward and, dare I say, enjoyable.
It lets you write clean, highly readable tests for even the most complex API endpoints. The best part? Its fluent, BDD-style syntax makes the tests easy for everyone on the team—from developers to QAs—to understand at a glance.
Why Rest Assured Is a Game Changer for API Testing

Let’s be real: APIs are the connective tissue of modern software. If they’re not reliable, nothing works. This isn’t just a hunch; the market reflects it. The global API testing market is expected to explode from USD 1.5 billion in 2023 to an incredible USD 12.4 billion by 2033. That staggering growth tells you everything you need to know about the demand for solid, automated testing tools.
This is exactly where Rest Assured shines. It cuts through the noise of traditional HTTP clients by offering a Domain-Specific Language (DSL) that makes your test code practically self-documenting.
The Power of Readability and Simplicity
The single biggest win with Rest Assured is its human-readable syntax. It follows a clean Given/When/Then structure that naturally describes what you’re testing. This isn’t just about making the code look nice; it has huge practical benefits:
- Faster Onboarding: New team members can look at a test and immediately grasp what it does without getting lost in the weeds of the library.
- Easier Maintenance: When an API inevitably changes, updating a clear, readable test is way faster than trying to decode a complex mess of code.
- Better Collaboration: Product owners and manual QAs can actually read the test scenarios, which helps build a shared understanding of how the API is supposed to behave.
This relentless focus on simplicity is why so many teams choose it over other options. For a wider view, you might find our guide on REST API testing strategies useful.
The true value of Rest Assured isn’t just in making API calls; it’s in making your intentions clear. A test that reads
when().get("/users/123").then().statusCode(200)is universally understood, reducing ambiguity and preventing bugs.
Let’s quickly summarize what makes Rest Assured such a strong contender for your API automation toolkit.
Core Advantages of Rest Assured at a Glance
This table breaks down the key features and why they matter for day-to-day testing work.
| Feature | Benefit for Developers & QAs |
|---|---|
| BDD-Style Syntax | Makes tests incredibly readable (Given/When/Then), improving collaboration and maintainability. |
| Native Java Integration | Works seamlessly with JUnit and TestNG, so it fits right into your existing CI/CD pipelines. |
| No Boilerplate | Eliminates the need for writing low-level HTTP client code, letting you focus purely on the test logic. |
| Rich Assertions | Provides extensive support for validating headers, status codes, JSON/XML bodies, and even JSON Schema. |
| Built-in Authentication | Handles common authentication schemes (Basic, OAuth, Digest) out of the box, simplifying complex tests. |
Ultimately, these features combine to create a testing experience that is both powerful and efficient.
Seamless Integration and Flexibility
Rest Assured isn’t some isolated tool you have to force into your workflow. It’s built to integrate perfectly with the Java testing frameworks you already use, like JUnit and TestNG. You don’t have to rip out your existing setup to start using it.
This native integration means your API tests can run right alongside your unit and integration tests as part of the same build process. The library is also incredibly versatile, offering built-in support for everything from complex authentication flows and JSON schema validation to file uploads. It’s a true workhorse for any modern Java project.
Building Your First Rest Assured Project
Alright, let’s move from theory to practice. This is where the real learning happens, and getting your project foundation right from the start will save you from a world of headaches later on. We’re going to walk through setting up a clean Maven project, perfectly configured for writing solid, scalable API tests with Rest Assured.
This quick visual gives you a bird’s-eye view of the setup process.
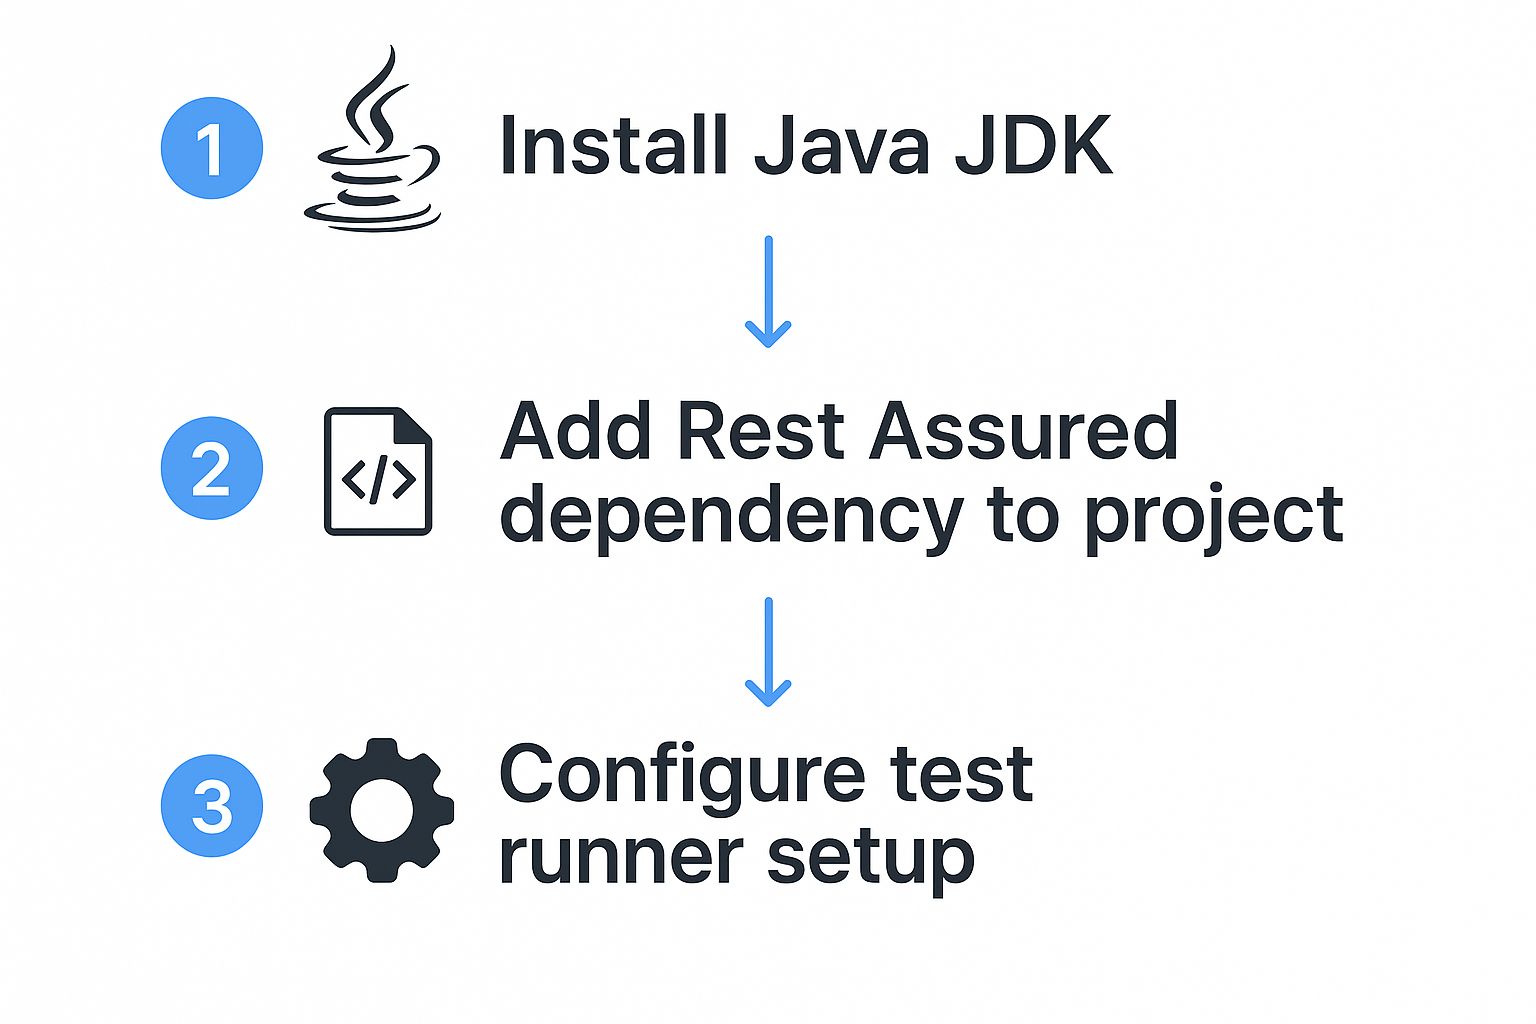
As you can see, the path from a basic Java environment to a fully configured project is pretty direct. The key is pulling in the right dependencies.
Configuring Your Maven Dependencies
Maven is a lifesaver for managing all the libraries your project depends on. To get started with Rest Assured API testing, we just need to declare a few core dependencies in our pom.xml file. Think of this file as your project’s recipe—it tells Maven exactly what ingredients to fetch.
The first, and most obvious, is Rest Assured itself. This is the core library that gives you that slick, fluent API for making HTTP requests and checking responses. Without it, you’d be stuck writing a ton of low-level boilerplate code.
Next, you’ll need a testing framework to actually run your tests. We’ll be using JUnit 5 (specifically, the Jupiter engine), which is the modern standard in the Java ecosystem. It integrates perfectly with Rest Assured and provides essential tools like the @Test annotation for structuring your test cases.
Finally, let’s pull in Hamcrest. While Rest Assured comes with its own set of assertions, Hamcrest’s library of “matchers” makes your validation logic incredibly expressive and easy to read. It lets you write assertions that feel like plain English, like checking that a body("name", equalTo("John Doe")).
Here’s the block you’ll need to add to the <dependencies> section of your pom.xml:
- Rest Assured: The core library for API testing.
- JUnit 5: The test runner and framework.
- Hamcrest: For readable, powerful assertions.
<!-- JUnit 5 (Jupiter) for running tests -->
<dependency>
    <groupId>org.junit.jupiter</groupId>
    <artifactId>junit-jupiter-engine</artifactId>
    <version>5.9.1</version>
    <scope>test</scope>
</dependency>

<!-- Hamcrest for expressive assertions -->
<dependency>
    <groupId>org.hamcrest</groupId>
    <artifactId>hamcrest</artifactId>
    <version>2.2</version>
    <scope>test</scope>
</dependency>
Establishing a Scalable Project Structure
With your dependencies sorted, the next step is organizing your project files. A clean structure isn’t just about looking good; it’s about making your test suite easy to navigate, maintain, and expand as your API evolves.
Sticking to the standard Maven project structure is the best way to go.
src/test/java: This is home base for all your test classes. As your project grows, you can organize this further into packages that mirror your API’s features (e.g.,com.yourapp.tests.users,com.yourapp.tests.products).src/test/resources: This directory is perfect for stashing any external files your tests might need. Think JSON request bodies,config.propertiesfiles, or even test data in CSV format.
This simple separation keeps your test logic clean from your data and configuration—a best practice that really pays off on larger projects. And just like that, your environment is fully configured and ready for you to write your first API test.
Writing Your First API Test Case
Alright, with the project foundation sorted, it’s time for the fun part: writing your first automated API test. This is where you’ll really see the power of Rest Assured’s clean, readable syntax. We’re going to use the classic Given-When-Then structure—a cornerstone of Behavior-Driven Development (BDD)—which makes your tests incredibly easy to understand, even for non-technical folks on your team.
Our goal here is simple. We’ll hit a public API endpoint with a GET request, grab the response, and then check if that response is what we expected. This basic pattern is the bread and butter of almost all API testing with Rest Assured.
Structuring Your Test with Given-When-Then
The magic of Rest Assured is its fluent DSL (Domain-Specific Language). It breaks every test down into three logical parts, which completely removes ambiguity and makes the test’s purpose crystal clear from a single glance.
- Given(): This is your setup block. Think of it as establishing the preconditions for your test. Here, you’ll define things like request headers, query parameters, auth details, or the request body itself.
- When(): This part is all about the action. It’s the trigger for your test, which is almost always the HTTP method you’re sending, like
.get(),.post(),.put(), or.delete(). - Then(): Finally, this is where you validate everything. You’ll check the status code, verify headers, and dig into the response body to make sure the API behaved exactly as it should have.
This pattern turns what could be a complex API call into a simple, almost plain-English statement. That clarity makes your entire test suite much easier to read and, more importantly, to maintain down the road.
Your First GET Request Example
Let’s put this into practice. We’ll build a test that pulls data for a single user from the public reqres.in API. The plan is to verify that the API gives us a success code and that the user’s email address is correct.
To start, create a new Java class inside your src/test/java directory. You can call it something like UserAPITests. Inside this class, we’ll pop in our first test method, making sure to annotate it with @Test from JUnit.
import io.restassured.RestAssured; import org.junit.jupiter.api.Test; import static io.restassured.RestAssured.given; import static org.hamcrest.Matchers.equalTo;
public class UserAPITests {
@Test
public void testGetUserById() {
    // Setting the base URI for the API
    RestAssured.baseURI = "https://reqres.in/api";

    given().
        // No specific preconditions for this simple request
    when().
        get("/users/2"). // The action: performing a GET request to the endpoint
    then().
        assertThat().
        statusCode(200). // Assert the HTTP status code is 200 OK
        and().
        contentType("application/json; charset=utf-8"). // Verify the response content type
        and().
        body("data.email", equalTo("[email protected]")); // Validate a specific field in the JSON response body
}
}
Notice how the code reads almost like a sentence? We set up the request, perform the action, and then list our expectations. This is the core advantage of using Rest Assured—it’s all about clarity.
Breaking Down the Assertions
In that then() block, we made three critical checks. You’ll find yourself using these constantly in your own API tests.
statusCode(200): This is your most fundamental check. It simply confirms the request was successful by asserting the HTTP status code is 200 OK. No test should go without it.contentType("..."): Verifying theContent-Typeheader is a good practice that ensures the API is sending back data in the format you expect—in this case, JSON.body("data.email", equalTo("...")): This is where the real validation happens. Using a simple path (data.email), we can drill down into the JSON response to pinpoint a specific field and use a Hamcrest matcher (equalTo) to confirm it has the correct value.
And just like that, with only a few lines of highly readable code, you’ve created a repeatable, automated test that validates a key piece of your API. From here, you can run this test, tweak it, and use it as a template to build out your entire API test suite.
Mastering Advanced API Testing Scenarios

Moving beyond simple GET requests is where your Rest Assured API testing skills really start to pay off. Real-world applications are all about creating, updating, and deleting data, which makes mastering POST, PUT, and DELETE requests an absolute must. This is the point where you stop just reading data and start actively manipulating it, simulating what users actually do.
The good news is that Rest Assured makes sending a payload—usually in JSON format—incredibly straightforward. You can pass the request body as a simple String, a Map, or even a Plain Old Java Object (POJO). Rest Assured handles the JSON serialization for you automatically, which is a huge time-saver.
Creating Resources with POST Requests
A classic example is creating a new user. To do this, you’ll fire off a POST request and attach the user’s details as a JSON payload in the body. Pay attention to how the body is defined right in the given() block, setting up all the request’s preconditions before it’s sent.
import io.restassured.RestAssured; import org.junit.jupiter.api.Test; import static io.restassured.RestAssured.given; import static org.hamcrest.Matchers.*;
public class UserCreationTests {
@Test
public void testCreateUser() {
    RestAssured.baseURI = "https://reqres.in/api";

    String requestBody = "{ \"name\": \"morpheus\", \"job\": \"leader\" }";

    given()
        .header("Content-Type", "application/json")
        .body(requestBody).
    when()
        .post("/users").
    then()
        .statusCode(201) // Assert that the resource was created
        .body("name", equalTo("morpheus"))
        .body("id", notNullValue()); // Verify an ID was generated
}
}
In this test, we’re not just looking for a 200 OK. We specifically assert a 201 Created status code, which is the correct response for a successful POST. We then double-check that the response contains the name we sent and—most importantly—that the API generated a new id for our user.
Chaining API Calls for Realistic Workflows
In the real world, API calls don’t happen in a vacuum. You often need to run a sequence of actions, like creating a resource and then immediately turning around to update it. This is where chaining API calls comes into play, letting you grab a value from one response and feed it into the next request.
Rest Assured’s extract() method is your best friend for this. It lets you pluck a specific value right out of a response body and save it to a variable. For instance, after creating that user, we can extract their new id and use it to build a follow-up PUT or DELETE request.
Chaining API calls is a powerful technique for building end-to-end tests that mirror real user workflows. By extracting an ID from a POST response and using it in a PUT or DELETE request, you validate the entire lifecycle of a resource within a single, coherent test.
This technique is essential for testing multi-step processes that are common in any application:
- User Registration: Create a user (POST), log them in to get an auth token (POST), then fetch their profile using that token (GET).
- Order Placement: Add an item to the shopping cart (POST), complete the checkout process (POST), and then pull up the order history to verify it (GET).
When you link your API calls together like this, your tests start to feel much more like actual user journeys, catching bugs that isolated checks would completely miss.
Best Practices for Robust and Maintainable Tests
As your test suite balloons in size, keeping it clean and maintainable can become a real headache. Trust me, adopting a few key practices from day one will save you a world of pain later.
- Use a
baseURI: Always set a globalbaseURIat the start of your test classes (RestAssured.baseURI = "..."). This keeps your code DRY (Don’t Repeat Yourself) and prevents you from hardcoding the same URL in every single test. - Centralize Authentication: If your API needs authentication, don’t copy-paste the token logic everywhere. Build a helper method that handles it. This keeps the auth logic in one place and lets your tests focus on what they’re actually supposed to be testing.
- Organize Tests Logically: Group your tests by feature or API resource. Think
UserTests.java,ProductTests.java, andOrderTests.java. This simple structure makes it a breeze to find tests and understand your coverage at a glance.
Ultimately, solid rest assured api testing is a massive boost to your team’s efficiency. Since API tests are lighter and faster to run than UI tests, you can execute them more often, cover more ground, and catch bugs much earlier in the pipeline. According to Allied Market Research, this approach directly contributes to faster, more reliable releases. It just makes your entire testing effort more scalable and impactful.
Integrating Tests into Your CI/CD Pipeline
Running automated tests on your local machine is a good start, but the real magic happens when they become part of your team’s daily workflow. This is where integrating your Rest Assured API testing suite into a CI/CD pipeline comes in. It transforms your tests from a personal safety net into an automated quality gate for the entire project.
Think of it as an always-on guardian for your codebase. Every time a developer pushes a change, an automated process kicks off that builds the application and runs your entire Rest Assured suite. If a single test fails, the build breaks, and everyone knows instantly. This is how you catch regressions the moment they happen, not days later.
Configuring a GitHub Actions Workflow
Let’s look at a real-world example using GitHub Actions, which is a fantastic and straightforward tool for this. You just need a single YAML file in your repository’s .github/workflows directory to tell GitHub exactly what to do.
A typical workflow for this looks something like this:
- Checkout Code: First, it grabs the latest version of your code from the repo.
- Set up Java: Next, it makes sure the right Java Development Kit (JDK) is ready to go.
- Build with Maven: Finally, it runs a command like
mvn clean installormvn clean testto compile the code and, most importantly, execute your tests.
This simple setup ensures your API tests always run in a clean, consistent environment. No more “but it works on my machine” excuses.
By making API tests a mandatory check in your pipeline, you create a powerful feedback loop. Developers can no longer merge code that breaks an API endpoint, preventing bugs from ever reaching a staging or production environment.
The Value of Continuous Feedback
This isn’t just a technical task; it’s a cultural shift. It builds a shared responsibility for quality where stable APIs are everyone’s job. As software increasingly relies on APIs, this kind of automated validation is no longer a “nice-to-have”—it’s critical.
The industry sees this trend, too. The API management market is projected to explode from USD 6.85 billion in 2025 to a massive USD 32.48 billion by 2032. You can read more on this growth at Coherent Market Insights.
This explosive growth underscores just how vital reliable, automated quality checks have become. To dig deeper into refining your setup, check out our guide on CI/CD pipeline optimization. Hooking your Rest Assured suite into your pipeline is the best way to ensure your APIs stay stable and trustworthy with every single deployment.
Answering Your Top Rest Assured Questions
Even with a library as straightforward as Rest Assured, a few questions always seem to pop up when engineers first dive in. Let’s tackle some of the most frequent ones I hear.
Getting these cleared up early on can save you a ton of frustration down the road. These are the “I wish I knew that sooner” kinds of tips.
How Do I Handle Authentication?
This is probably the number one question. Handling authentication is a core part of Rest Assured API testing, and thankfully, the library has great built-in support for the most common schemes. This means you don’t have to mess around with manually adding tokens to headers.
You can slot your authentication details right into the given() block of your request, keeping everything clean and readable.
- Basic Auth: For simple username and password schemes, just use
.auth().basic("username", "password"). - OAuth 2.0: Working with a modern token-based API? No problem. Use
.auth().oauth2("your_access_token").
Placing the auth logic right next to the request it protects makes your tests incredibly easy to understand at a glance.
Can Rest Assured Test SOAP APIs?
The short answer is yes, but it’s not really what Rest Assured was built for. While it’s heavily optimized for RESTful services and their typical JSON or XML payloads, you can bend it to your will for SOAP.
To make it work, you’d have to build the entire SOAP XML envelope as a string yourself and then manually set the Content-Type header to application/soap+xml. It’s functional, but it feels clunky. You lose a lot of the fluent, elegant syntax that makes Rest Assured so great for REST.
My Take: While it’s possible, if you’re doing heavy-duty SOAP testing, you’re probably better off with a tool designed specifically for that. For REST APIs, however, Rest Assured is king.
How Can I Validate JSON Schemas?
This is a powerful technique for catching breaking changes in an API without having to write dozens of individual assertions. Schema validation ensures that a JSON response sticks to a predefined structure. Rest Assured makes this incredibly simple by integrating with the json-schema-validator library.
Once you’ve added the dependency to your pom.xml, you can add a single check in your then() block.
It looks like this:
then().body(matchesJsonSchemaInClasspath("user-schema.json"));
With just that one line, Rest Assured will automatically validate the entire response body against the schema file you’ve placed in your src/test/resources folder. It’s a fantastic way to enforce API contracts and make your rest assured api testing far more robust and easier to maintain.
Ready to validate your application with real user traffic? GoReplay allows you to capture production traffic and replay it in your testing environment, ensuring your changes are bulletproof before they go live. Learn more at https://goreplay.org.